In the world of smart home devices, Apple’s HomePod stands out as a premium option for those seeking high-quality sound and seamless integration with the Apple ecosystem. However, like any sophisticated technology, there may come a time when you need to reset your HomePod. Whether you’re troubleshooting issues, preparing to sell or give away your device, or simply looking to start fresh, knowing how to reinitialize your HomePod is a valuable skill. In this comprehensive guide, we’ll walk you through the process step by step, ensuring that you can confidently reset your HomePod whenever the need arises.
Why Reset Your HomePod?
Before diving into the specifics of how to reset your HomePod, it’s essential to understand why you might need to perform this action. Several common scenarios warrant a reset:
Troubleshooting Persistent Issues
If your HomePod is experiencing glitches, connectivity issues, or other persistent problems, a reset can often resolve these issues by clearing out any temporary software conflicts or errors.
Preparing to Sell or Give Away Your HomePod
Before parting ways with your HomePod, whether you’re selling it to upgrade to a newer model or passing it on to a friend or family member, it’s crucial to reset the device to its factory settings to protect your privacy and ensure a smooth transition for the new owner.
Starting Fresh
Even if your HomePod is functioning perfectly, there may be occasions when you want to start with a clean slate, removing all custom settings, preferences, and personal data from the device. A reset allows you to do just that, restoring your HomePod to its original state.
How to Reset Your HomePod
Now that we’ve explored the reasons for resetting your HomePod let’s delve into the step-by-step process. Follow these instructions carefully to ensure a successful reset:
Gather Your Equipment
Before initiating the reset process, gather the following items:
Your HomePod
An iPhone or iPad with the Home app installed
A stable Wi-Fi connection
Having these items on hand will streamline the reset process and help ensure a smooth experience.
Open the Home App
Unlock your iPhone or iPad and navigate to the Home app. This app allows you to manage all of your HomeKit-enabled devices, including your HomePod.
Access HomePod Settings
Once you’ve opened the Home app, locate and tap on the icon representing your HomePod. This will bring up the device’s settings menu.
Navigate to Details
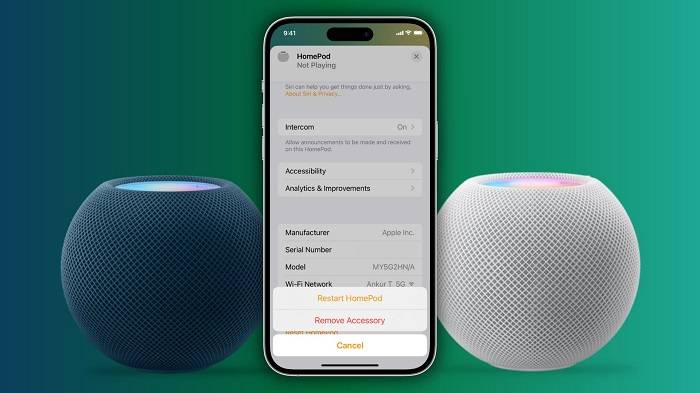
Within the HomePod settings menu, locate and tap on the “Details” option. This will provide you with additional options and information about your HomePod.
Scroll Down and Tap “Remove Accessory”
Scroll down the details page until you find the option labeled “Remove Accessory.” Tap on this option to initiate the removal process.
Confirm Removal
A confirmation prompt will appear, asking you to confirm that you want to remove the HomePod from your HomeKit setup. Confirm your decision by tapping “Remove.”
Reset Your HomePod
After confirming the removal, your HomePod will be reset to its factory settings automatically. This process may take a few minutes to complete, during which your HomePod will restart.
Set Up Your HomePod Again (Optional)
If you plan to continue using your HomePod after resetting it, you’ll need to set it up again from scratch. Follow the initial setup instructions provided by the Home app to reconnect your HomePod to your Wi-Fi network and customize its settings to your preferences.
Tips for a Successful Reset
While the reset process for your HomePod is relatively straightforward, there are a few additional tips to keep in mind to ensure a smooth experience:
Backup Important Data
Before initiating a reset, consider backing up any important data or settings stored on your HomePod. While a reset will restore the device to its factory settings, backing up your data beforehand can help you avoid losing any valuable information.
Ensure a Stable Wi-Fi Connection
A stable Wi-Fi connection is essential for successfully resetting your HomePod. Before beginning the reset process, verify that your iPhone or iPad is connected to a reliable Wi-Fi network to prevent any interruptions during the procedure.
Follow Instructions Carefully
Pay close attention to the instructions provided by the Home app and follow them carefully to ensure that you perform each step correctly. Skipping or overlooking any steps could result in issues during the reset process.
Advanced Troubleshooting Techniques
While the standard reset process outlined above resolves many common issues with the HomePod, there may be instances where more advanced troubleshooting techniques are necessary. In this section, we’ll explore some additional steps you can take to address specific problems:
Network Troubleshooting
If your HomePod is experiencing connectivity issues or is unable to connect to your Wi-Fi network after a reset, you may need to troubleshoot your network settings. Begin by ensuring that your Wi-Fi network is functioning correctly and that your HomePod is within range of your router. You can also try restarting your router or updating its firmware to resolve any network-related issues.
Additionally, check for any sources of interference that may be disrupting the signal to your HomePod, such as other electronic devices or thick walls. Adjusting the placement of your HomePod or using a Wi-Fi extender can help improve connectivity in areas with poor signal strength.
Software Updates
Updating your HomePod to the latest software version can often resolve bugs or performance issues that may be causing problems. To check for updates, open the Home app on your iPhone or iPad, navigate to the HomePod settings, and look for the option to install any available updates. Make sure your device is connected to a stable Wi-Fi network and has sufficient battery life to complete the update process.
Factory Reset Using iTunes
In rare cases where a standard reset does not resolve persistent issues with your HomePod, you may need to perform a factory reset using iTunes. To do this, connect your HomePod to your computer using a USB cable and open iTunes. Select your HomePod from the list of devices and choose the option to restore it to its factory settings. Follow the on-screen instructions to complete the reset process, and then set up your HomePod again using the Home app on your iOS device.
Contact Apple Support
If you’ve exhausted all troubleshooting options and your HomePod is still experiencing issues, it may be time to contact Apple Support for assistance. Apple’s support team can provide personalized guidance and troubleshooting steps based on the specific issues you’re encountering. You can reach Apple Support via phone, online chat, or in-person at an Apple Store or authorized service provider.
Preventing Future Issues
Once you’ve successfully reset your HomePod and resolved any existing problems, it’s essential to take steps to prevent similar issues from occurring in the future. Here are some tips for maintaining optimal performance:
Keep Your HomePod Updated
Regularly check for software updates and install them promptly to ensure that your HomePod has the latest features and bug fixes. You can enable automatic updates in the Home app to receive updates automatically.
Avoid Overloading Your Network
Limit the number of devices connected to your Wi-Fi network and avoid streaming high-bandwidth content simultaneously on multiple devices. This can help prevent network congestion and ensure that your HomePod maintains a stable connection.
Monitor Environmental Factors
Pay attention to environmental factors that may affect the performance of your HomePod, such as temperature, humidity, and exposure to sunlight. Avoid placing your HomePod near sources of heat or moisture, as this can damage the device over time.
Regular Maintenance
Periodically clean your HomePod and its surrounding area to remove dust, dirt, and debris that may accumulate over time. Use a soft, dry cloth to gently wipe down the exterior of the device, and avoid using abrasive cleaners or solvents that could damage the finish.
By following these proactive measures, you can help ensure that your HomePod remains in optimal condition and continues to provide you with the best possible audio experience for years to come.
Related Post:
Swipe and Shut: Mastering the Art of Closing All Apps on Your iPhone
Effortlessly Clear Your iPhone: Master the One-Step Method to Close All Apps Instantlyb
From Zero to Hero: Lightning-Fast Charge Times of the Apple Watch Series 8 Unveiled!
Resetting your HomePod may seem like a daunting task, but with the right guidance, it’s a straightforward process that can be completed in just a few minutes. Whether you’re troubleshooting issues, preparing to sell or give away your device, or simply looking to start fresh, knowing how to reset your HomePod is a valuable skill that every owner should possess. By following the step-by-step instructions outlined in this guide and keeping our tips in mind, you can confidently reinitialize your HomePod whenever the need arises, ensuring that it continues to provide you with the exceptional audio experience and seamless integration you’ve come to expect from Apple’s innovative smart speaker.


